Making Sets and Props Stop Motion Part 3 (BSA 124)
Making Sets and Props Stop Motion Part 3
Our sets and props are almost done, probably we'll finish it in another one session. Just the same as last week, I'm continuing Zack's puppet by covering it with plasticine, the colour is dominated by black with some white and black mixture that I made for the pants so it looks more natural. Megan is working on Lulu's puppet and Chloe with the UI.
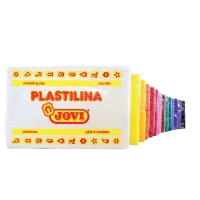
For Zacks head and hands, I'm using the normal skin colour tone, black for his top and hairs, red for his long sleeves arms, mixture of black and white for his pants and blue for the shoes. This is the brand that we are using for making the puppets:

The texture is alright, sometimes it is quite hard to be formed, but once we get the perfect shape that we want, it is a lot easier to adjust it. I can also smoother the surface with just my hands and a nail without using a lot of materials. Overall, it is a good product, and after I searched the internet on how much does it cost, it costs pretty reasonable. This is Zack's puppet:
Just couple minutes before our class finishes, we did some lighting tests. We are using Nikon D-90 for the camera alongside with the tripod and one light one the left side. The perspex that we ordered has come, so we tried to adjust it on top of the UI set and try to get the proper lighting with it. The first couple pictures were quite dim and we could see the reflection on it. But finally, we get the perfect shot, we might to hire another light for the right side so it will look a lot brighter.
Our sets and props are almost done, probably we'll finish it in another one session. Just the same as last week, I'm continuing Zack's puppet by covering it with plasticine, the colour is dominated by black with some white and black mixture that I made for the pants so it looks more natural. Megan is working on Lulu's puppet and Chloe with the UI.
For Zacks head and hands, I'm using the normal skin colour tone, black for his top and hairs, red for his long sleeves arms, mixture of black and white for his pants and blue for the shoes. This is the brand that we are using for making the puppets:

The texture is alright, sometimes it is quite hard to be formed, but once we get the perfect shape that we want, it is a lot easier to adjust it. I can also smoother the surface with just my hands and a nail without using a lot of materials. Overall, it is a good product, and after I searched the internet on how much does it cost, it costs pretty reasonable. This is Zack's puppet:
Just couple minutes before our class finishes, we did some lighting tests. We are using Nikon D-90 for the camera alongside with the tripod and one light one the left side. The perspex that we ordered has come, so we tried to adjust it on top of the UI set and try to get the proper lighting with it. The first couple pictures were quite dim and we could see the reflection on it. But finally, we get the perfect shot, we might to hire another light for the right side so it will look a lot brighter.
That is the perspex that I'm talking about and the light on the left side
The first shot is so dim with the reflection
Still can see the reflection, after the iso has been set it looks a lot better
No more reflection, but still need one more light on the right side


Comments
Post a Comment